
Create an Easy Outline with Word’s Styles Feature
Microsoft Word has a wonderful tool called Styles that helps writers format and navigate their own manuscript as it grows closer to completion—and bigger in size. Follow this tutorial to learn how to format chapter and section headings, view the outline of your manuscript, and generate an automatic table of contents that links to different parts of the document. This is something I do for every manuscript that I edit, but many writers find it useful when they are reviewing and editing their own work! This tutorial is for PC users—Mac version coming soon!
Tip: Always save backup versions of your manuscript, especially before doing major formatting edits to it. Some people save to the cloud, others to a hard drive—I do both!
How do I use Word’s Styles feature?
Select the titles of your chapters, parts, and/or sections, and then select a format for them from the “Styles” bar in Word. Styles should appear in the ribbon at the top of the home page. You can always right click on the ribbon to add or remove features.
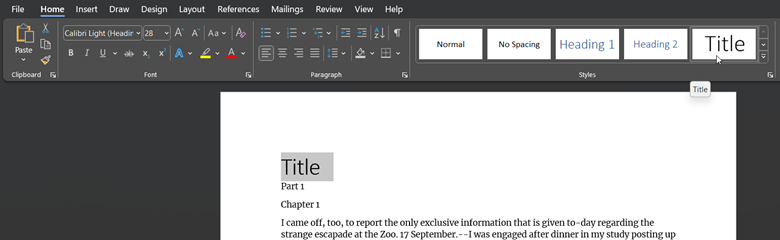
Utilize the various levels of headings to differentiate between parts, chapters, and sections. You’ll want to use “Heading 1” for the highest level (such as parts), “Heading 2” for the lower level (such as chapters), and so on.
Tip: Do you dislike the fonts and colors Word uses for the heading styles? Honestly, I agree! Keep reading and I’ll show you how to create a custom template at the end of this tutorial!
There are a few other formats that you may find helpful, such as subtitle or quote (for a block quote that needs to be its own paragraph). You may choose to style all of the plain text (everything that isn’t a heading) as “Normal,” but this is less important when it comes to just generating an outline and table of contents for yourself. Hit Ctrl+A to select the entire text, format it as “Normal,” then go back through and format each heading. That way, you aren’t stuck trying to separately format the section of text between each heading!
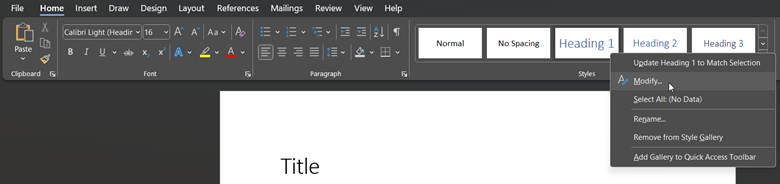
If you forget what level of heading you used for a certain part, you can select that text and check to see which level has a thin white line around it. For example, Section 1 below is styled as “Heading 3:”

Now that I’ve styled my document, how does it help?
You can now create a quick, easy, and accurate outline of your manuscript by selecting “View” in the top menu bar, then clicking on “Outline.”

Use this feature to make sure that the structure of your document flows smoothly, and that there is no missing content. If you’re using multiple levels (i.e. parts, chapters, and sections), double check that they are distributed equally across the manuscript. In other words, don’t let the first few chapters contain multiple sections while the last few chapters have none. A copyeditor can help you work through structural issues like these if you’re having trouble.

Simply click on “Close Outline View” to exit this screen.
Tip: I like to check “Show First Line Only” so that I can see a shortened, easy-to-read outline of the entire manuscript. If one of the headers was incorrectly formatted, you can adjust it from this screen.
Can I use Styles to generate my table of contents?
You can automatically generate a table of contents for your manuscript by clicking on “References” in the top menu, then clicking on “Table of Contents” on the far left hand side. Word will automatically add in all of your headings, matching them to the corresponding page number.

If you do not want section titles or other material to appear in the table of contents, click on “Custom Table of Contents” rather than selected one of the automatically generated templates. From here, you can reduce the number of levels shown in the table. You can also select “Modify” to change the style (font, color, spacing, etc.) of the table.

If you end up adding sections or adjusting your outline after generating a table of contents, you can simply click on it and select “Update Table” to make sure it’s accurate.
Once your table of contents has been created, you can Ctrl+Click on each heading title to jump to that location in the document. Talk about a great tool for editing!
How do I change the font and color of the headings?
Simply right click on the “Style” that you want to customize in the ribbon, then select “Modify.” You can also click on the pop out arrow on the bottom right corner of the “Styles” section in your toolbar or use the Alt+Ctrl+Shift+S shortcut. This will allow you to view all of the styles and then right click on the one that you want to modify.
From this window, you can change the font, size, color, spacing, alignment, and more. Word’s default is for your new style to apply to this document only, but you can click on “New documents based on this template” if you’d like to use your new format in all other documents.

If you want to make a heading always appear in all caps, you’ll have to click on “Format” at the bottom, then “Font,” and then you can change it to all caps.
Now your manuscript is formatted and customized to your preferences!
Dracula Lorem Ipsum courtesy of www.litipsum.com